Users have the ability to create, edit, and manage specifications. This includes selecting domains, variables, and codelists for each specification.
Create a New Specification
To create a specification, you must enter a name, select a study, and choose a specification type. You may optionally define attributes of the specification. If you do not choose a standard, you will have an option to do so on the Domain page. Specification attributes can be edited any time during specification development. After creating the specification, you should navigate to the domain page to select domains for the specification.
- Access Specifications from the Platform Menu under Metadata Management.
- Click the Add icon in the toolbar.
The Create Specification window opens. Fields with the asterisk are required.
- Enter the Name of the specification. This is a required field.
- Enter a Description of the specification.
- Select the Study from the drop-down list (you will see studies you have access to). This is a required field.
- Select the Type from the drop-down list: Mapping or Exception Listing.
- If Mapping is selected as the Type:
- Select the Standard from the drop-down list: ADAM, CDASH, Custom, or SDTM.
Note: If a standard is selected when creating the specification, then domains can only be selected from that standard and version. If you need to select domains from multiple standards, this field should not be selected.
- Select the Standard Version number from the drop-down list (options display depending on the selected Standard).
- Select the Controlled Terminology Version number from the drop-down list (options display depending on the selected Standard and Standard Version). A message will display if a controlled terminology version is required for the selected standard.
- Select the Therapeutic Area from the drop-down list.
- Select the Dictionary version from the drop-down list (i.e. MedDRA version).
- Select the Drug Dictionary version from the drop-down list (i.e. WHO Drug version).
- Select the Standard from the drop-down list: ADAM, CDASH, Custom, or SDTM.
- Enter the Version Name.
- Enter any appropriate Notes.
- Check the Requires Domain Approval checkbox if each domain must be approved individually for the specification to be approved.
- Click Save.
After saving the new specification, depending on the sort and filter you have applied to the list, you may need to use the Next Page icon in the panel toolbar to see your new specification. The new specification will automatically be checked as Active.
Edit a Specification
- Locate the specification you wish to edit and click the record or click in the checkbox at the left.
- Click the Edit icon in the toolbar (or right-click on the record and select Edit).
- The Edit Specification window opens and is populated with the current specification attributes.
- Make any modifications. All fields can be modified except the specification type.
- Select Save.
Manage Specification Details
- Locate the specification you wish to view details for and click the record or click in the checkbox at the left.
- Click the Details icon in the toolbar, and the Details window opens at the right side of the screen:
- Click the Edit icon in the top right to edit the specification.
- Click the x in the top right to close the Details window.
- Click the arrow at the left to expand each section to view Domains, Codelists, or Issues related to that listing.
- The blue badges beside Domains and Codelists indicates the number of domains and codelists added to the specification. Beside Issues, the red badge indicates how many open issues, and the green badge indicates how many answered, closed, and canceled issues.
- Click the Go to Domains, Go to Codelists, or Go to Issues buttons to go directly to Domains, Codelists, or Issues respectively.
Update the Status of a Specification
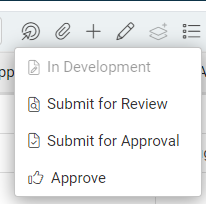
A specification is defaulted to the status of 'In Development'. Use the Change Status icon to update the status as you work through review cycles and approval. In order to edit a specification, the status must be 'In Development'.
- Click in the checkbox at the left of the specification, or right-click on a record.
- Click the Change Status icon in the toolbar, or if you right-clicked on a row select Change Status.
- Select the status from the drop-down.